If you’re new to the WordPress Block Editor a.k.a. Gutenberg, you’ll want to know some handy shortcuts to make life easier and editing faster. Here’s some of the basics, along with some useful shortcuts to get you started!
What Are Blocks?
A block is any item of content you add to your WordPress post. Every heading, paragraph, image, video, table, gallery is its own block. You create specific blocks depending on what type of content you want to add to your post.
How To Create A Block
You create a new block by simply pressing enter. This will automatically create a paragraph block, which is the most common text block (like the one I’m writing now).
Once you’ve created a new block, you can change the block type by clicking on the block and pressing the little plus icon on the right-hand side.
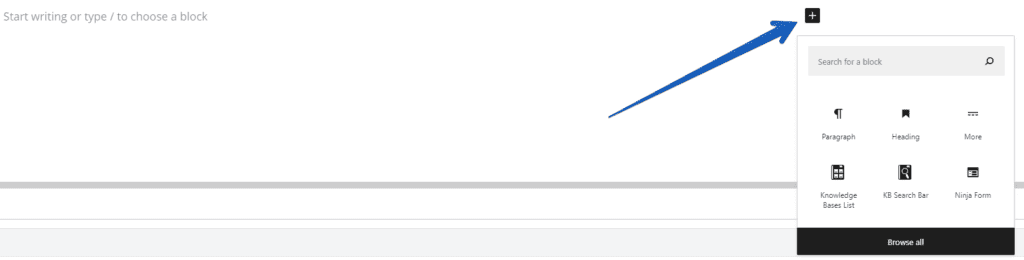
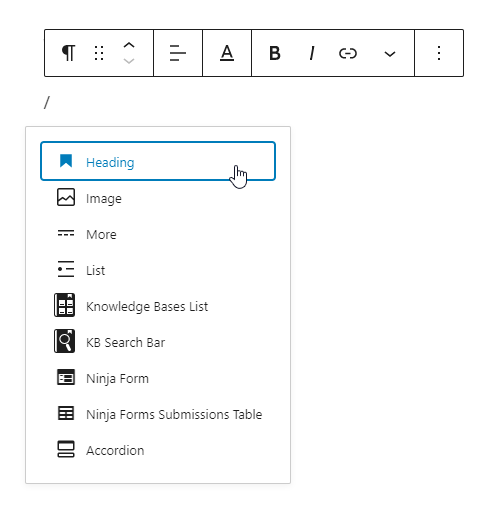
Or you can simply press the / key and type in the sort of block you want or select from the list that pops up.
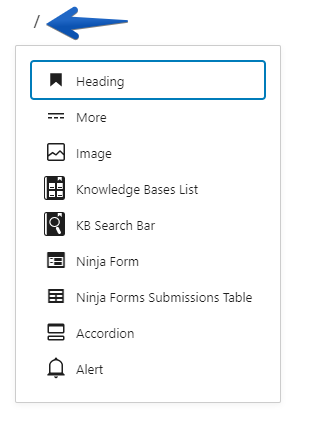
If you know what type of block you want, you can also simply type the / symbol, then type what sort of block you want and press enter. So for an image block, you would write /image. This will be come more clear to you as we go through the post.
How To Create A New Heading
There are a few ways to create a new heading. One way is to press enter to create a new block, and then press the plus sign and select the heading option.
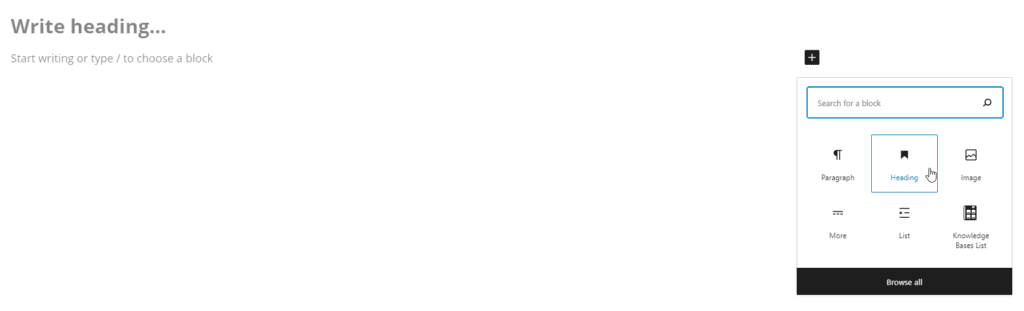
Another way is to type the / symbol and select heading.
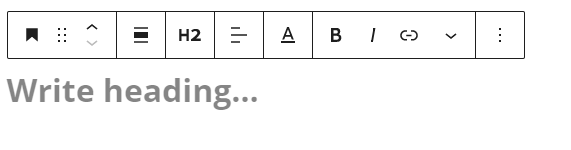
The easiest way is to use hashtags. Simply type # once and space bar to create a H1 heading. Two will make a H2, three will make H3, and so on. This only works at the beginning of a new block. The hashtags should disappear and your block will look like this:
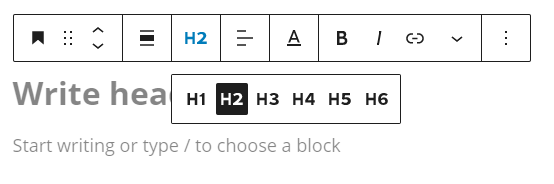
To change the type of heading in a block you’ve already created, simply click on the block, click the button that says H2 and select a different one.
How To Structure Your Headings
In the Block Editor, there are different types of headings, ranging from H1 to H6. The type of heading you use is important because it tells Google and your readers the structure of your page, which is quite important for Search Engine Optimization (SEO) purposes. Google likes structured content, and so do your readers. Think of them in terms of how you’d structure a book, with H1 being your main title, and H2 being each chapter, and H3 being titles within each chapter, and so on.
The H1 heading should only be used once on your post for the main title at the top of your page.
For your other main headings, you can use the H2 heading option. If you want to put a sub-heading under a main heading in your post, then opt for the H3 option.
How To Create A Paragraph Block
Creating a paragraph block is super easy. Simply press enter to create a new block and it should automatically be a paragraph block.
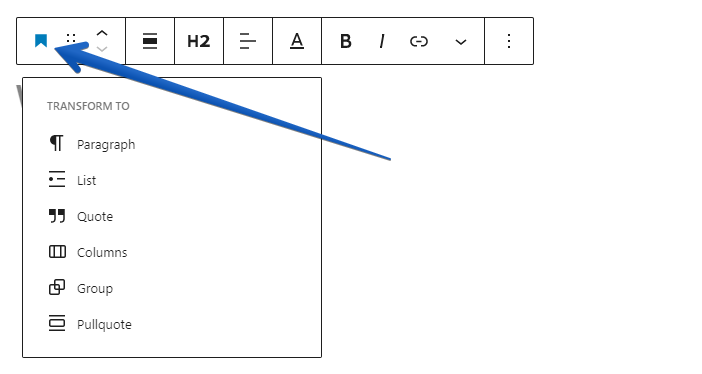
If you have a block that you want to convert to a paragraph block, simply click the button on the top left-hand corner of the block and select paragraph, which is what you want the block to transform to.
How to Add Images To Posts
To add an image to a post, simply create a new block and write /image. The block should then look like this:

You can either upload an image, select one from your media library, or simply drag and drop an image into the block. Keep in mind that if you have already used an image on your site, dragging and dropping it into another block may create a duplicate copy in your media library. So if you’ve already used an image before, you’re better off selecting it from your media library.
Another thing to keep in mind with images is the image size in terms of megabytes. You want to find a good balance between how clear you need the image to be and not overloading your server with data and slowing it down. Also keep in mind your readers, who may not want to use lots of their precious phone data loading the images on your post. For our uses, we try to keep each image below 100 kilobytes (there’s 1,000 kilobytes in a megabyte).
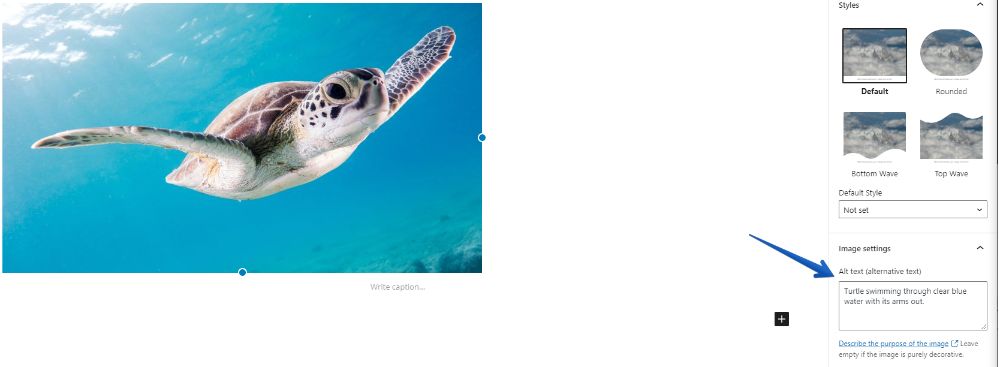
Another thing to be mindful of with images is the alt text. This is where you describe your image as though you were painting a picture for someone who couldn’t see the picture. This is for screen readers as well as helps Google to understand what your image is.
To find the alt text box, simply select your image and look at the options panel on the right of the page under block.
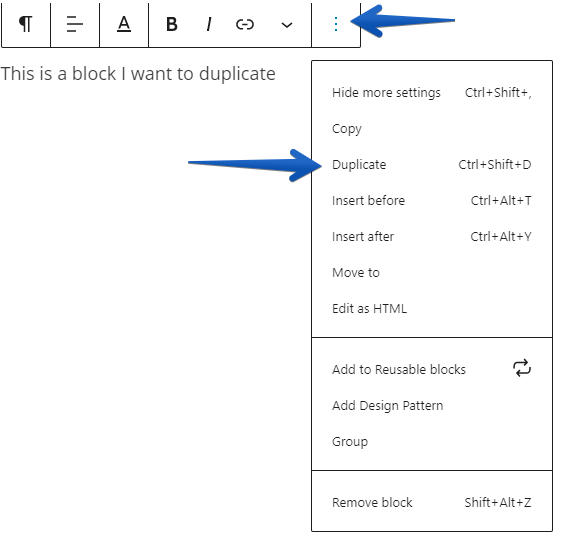
How to Duplicate a Block
Simply click on the block you want to duplicate and press ctrl + shift + D. This will create a duplicate of your current block directly below it.
This setting can also be found under the three dots on the right hand side of the toolbar when you select the block you wish to duplicate.
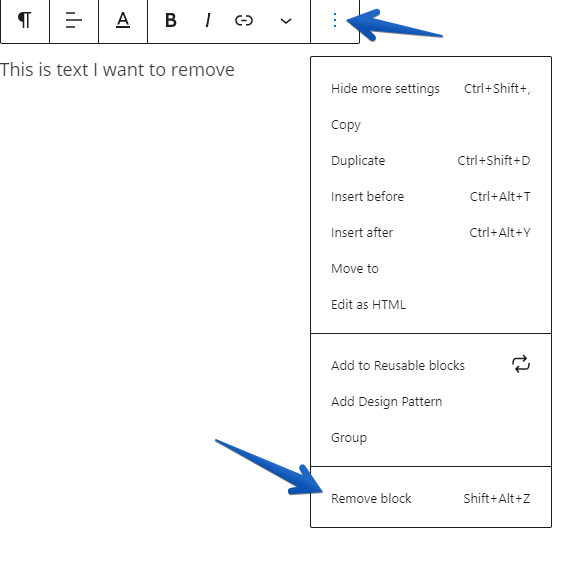
How to Delete a Block
Easily delete blocks by selecting the block and pressing shift + alt + z.
For image blocks, you can also select them and press backspace. But for text blocks, you’d have to highlight all the text for this to work. For big paragraph blocks, using the shift + alt + Z option is probably easiest.
You can also select the block you wish to delete, click the three dots on the right side of the toolbar and click remove block.
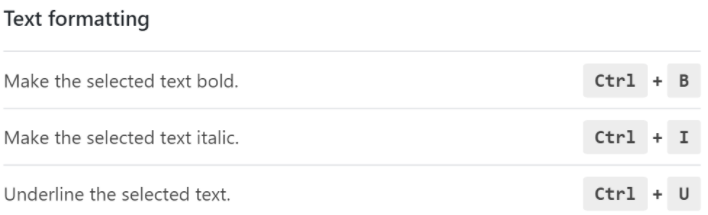
Very Basic Text Formatting
If you want your text to be bold like this, simply highlight the text and press ctrl + B on your keyboard.
If you want your text to be italic like this, simply highlight the text and press ctrl + i
If you want your text to be underlined like this, simply highlight the text and press ctrl + U
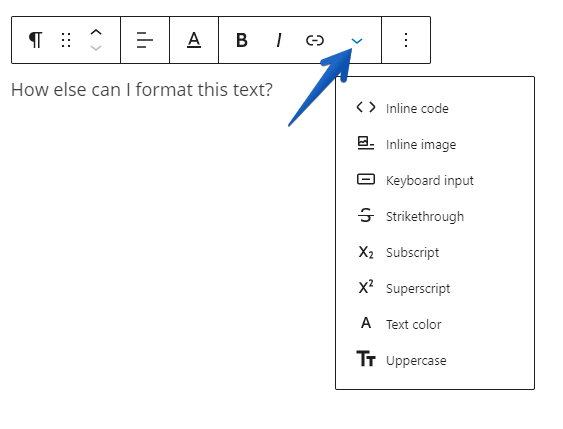
For other text formatting options, such as strikethrough and changing the text color, simply click the little arrow in the toolbar as shown below.
How To Move Blocks Around
To move a block up using the key shortcuts, simply select the block and press ctrl + shift + alt + T.
To move a block down, select the block and press ctrl + shift + alt + Y.
Now, that’s a lot of keys to remember, so I’m going to show you a couple of other ways to do it.
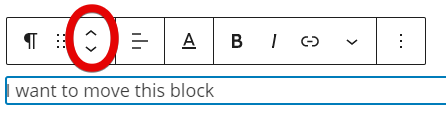
One way is to press the little up or down arrows in the toolbar above the block. This is useful if you’re not moving the block far in your post.
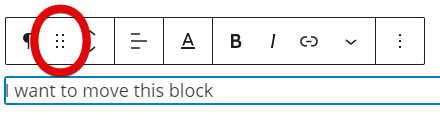
If you want to move the block a long way up or down in your post, you can grab the six dots on the toolbar and drag. It feels like you should be able to grab the block itself and drag, but at the time of me writing this post, you can’t. So, dot grabbing it is!
How To Insert A Block Above Or Below The Current Block
Pressing ctrl + alt + T will insert a paragraph block above the block you currently have selected.
If you want to insert a block below the block you currently have selected, simply press enter. If this doesn’t work because you’re writing a list or a quote, press ctrl + alt + Y to insert the block below.
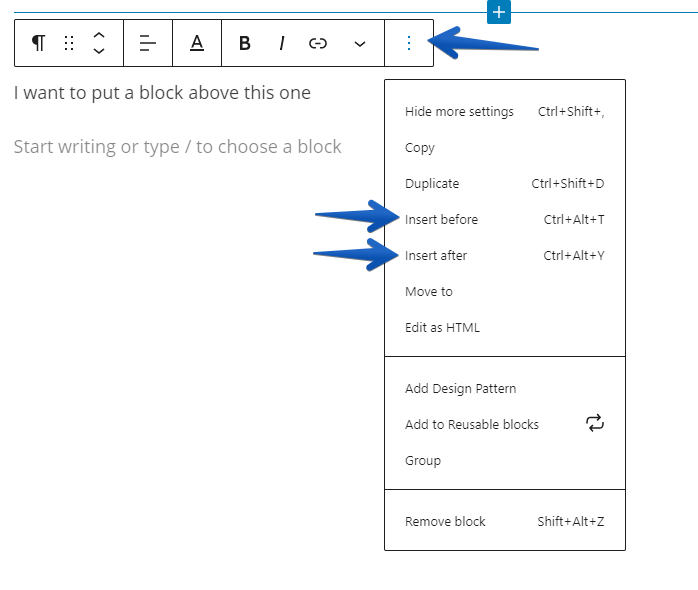
You can also select a block and click the three vertical dots on the toolbar and select insert before or insert after.
How To Undo And Redo
To undo the last thing you did, simply press ctrl + Z
To redo the last undo you did (in other words, undo your last undo), simply press ctrl + shift + Z
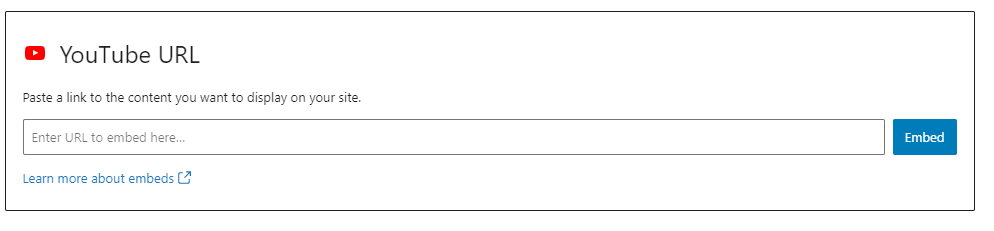
How To Embed A Video
To embed a video, simply create a new block and write /youtube. You can then grab your link from YouTube and paste it into the block and click embed.
Another way is to simply paste the link into a block, as the Block Editor can detect a lot of video links now.
How To Convert Text Into A Link
One easy way is to highlight the text you want to make into a link and press ctrl + K
Another option is to highlight the text and select the little link icon in the toolbar above the block and type in your link.
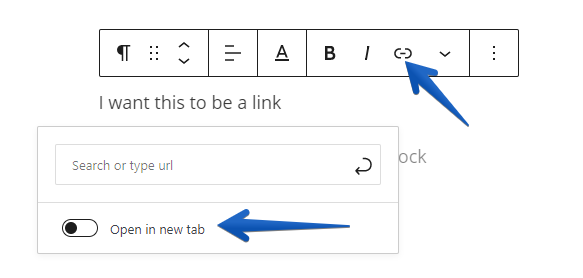
Remember to click open in new tab if you want your readers to be able to click a link and still keep your post open.
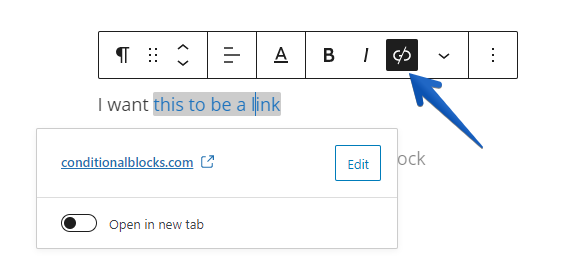
To unlink your text, you can select the linked text and press ctrl + shift + K or select the text and press the unlink button in the toolbar.
How To Insert A Quote
To insert a quote, simply create a new block and write > and then press space to insert a quote, which will be formatted as shown below.
This is my quote.
Me
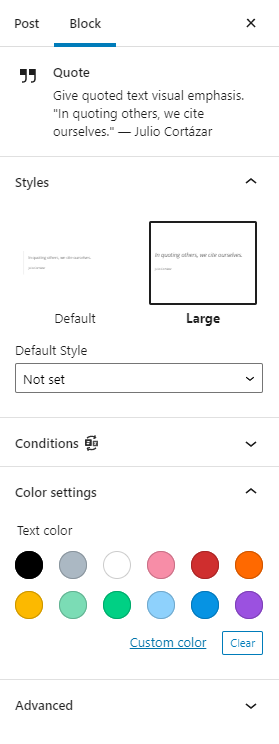
You can change your quote style and color settings in the toolbar on the right.
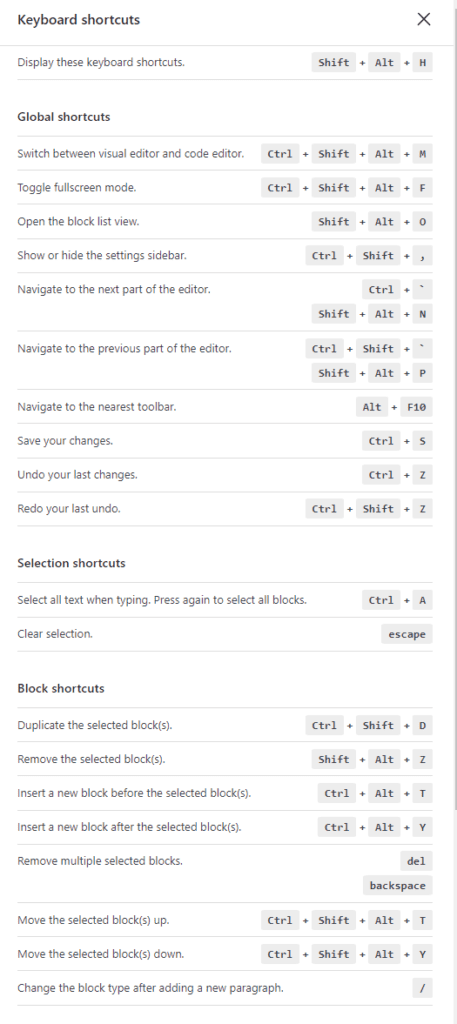
How To View More Block Editor Shortcuts
To bring up a list of shortcuts, simply press shift + alt + H which brings up this list of shortcuts!
Now you know how easy it is to create and edit posts using the WordPress Block Editor! Time to go put your great content out there! What are you waiting for?