The WordPress Block editor is rather exciting because it will soon be the tool that people use to design and create entire sites. At the time of writing, the Block Editor is for creating pages and posts. Full Site Editing is just around the corner.
We believe personalized content is the future of the web. Therefore, at Conditional Blocks, we want to take WordPress content to a new level, and bring features that change the visibility of any WordPress Block with a few clicks.
Examples of dynamic content
If you look around our site and documentation, you can see examples of how we use Conditional Blocks to enhance the experience. Here are a few examples of dynamic content you can create with WordPress + Conditional Blocks.
1. Create membership content.
You can select a single (or Group Block) and change the visibility to “Logged in users” only. This ensures that only users who are registered and logged into your WordPress site will see the content.
2. Schedule WordPress content.
Scheduling content is a powerful technique for marketing, which also doubles as an automation technique. Let’s say that you have an upcoming event: you can create a banner on your homepage and schedule it to appear when registration opens, and automatically remove the block again when registrations are closed.
You can also create recurring content based on the day of the week and time range. As an example, you might be a restaurant running a special on burgers every Friday. So you can create a block that appears to your customers only on Fridays.
We’ve got a whole post about how to schedule content, there’s even a video tutorial!
3. Be creative!
We have many available condition types in Conditional Blocks Pro and they can all be combined!
Combining conditions will allow you to create specific and targeted content that you can use for marketing. As an example, we have unique welcome messages on our home page for visitors who come from Google.com, Facebook and Twitter. You can even create unique content for visitors who come to your website via Facebook ads (we recommend the Query String conditions).
How to add visibility conditons to blocks with a plugin
- Download and install Conditional Blocks Pro onto your WordPress site.
- Open up any page or post in your WordPress site.
- Create a new block or select an exisiting block by clicking on it.
- In the sidebar you’ll find the settings for the selected block.
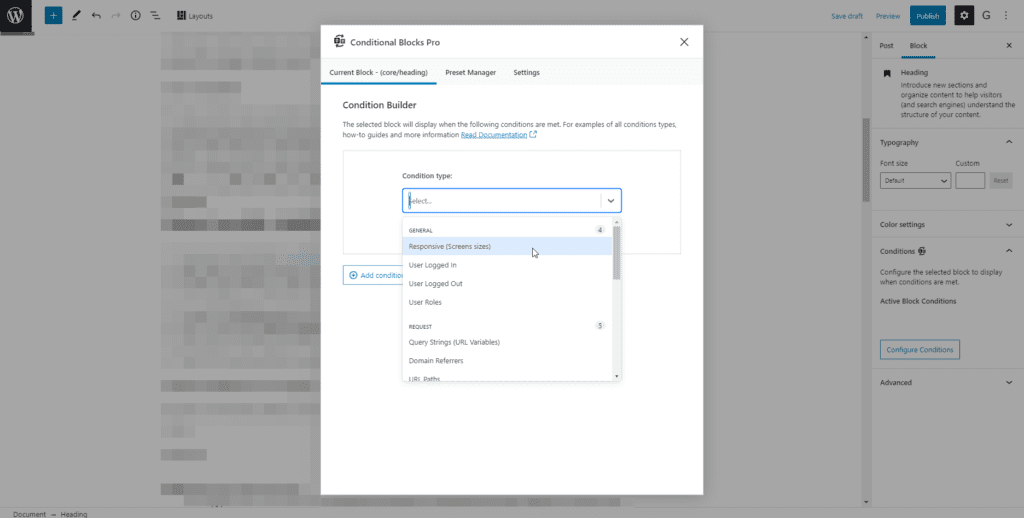
- Locate the Conditions tab and then Configure Conditions, The Condition Builder will now open.
- You can now click Add Condition to the selected block and selected your desired condition from the list.
- Once you’ve configured the conditions, you can save the page by clicking Update in the top right corner.
- That’s it! Your block will now only be visible to visitors if all of the applied conditions are met.
What conditions can I apply?
We are continuously adding more features to our plugin. Here’s the conditions you apply right now with a few clicks.
General
- Responsive (Screensizes)
Great for creating blocks that are best suited for viewing on mobile, tablet and desktop. - Logged in users
Great for membership content with Gutenberg blocks! Display blocks for logged in users only. - Logged out users
Tell logged out users about the benefits of signing up. Displays blocks for logged out users only. - User Roles
Great for membership sites and upsells! Display a block to logged in users who have specfic users roles.
Server Request
- Query Strings (URL Variables)
Great for adding dynamic content to pages based on the URL parameters. - Domain Referers
Running a Twitter promotion? No problem! Great for displaying content for people who are coming from your link on third-party sites. - URL Paths
Set the block visibility based on the current URL path. Great for reusable blocks across nested domain paths. - User-Agents (Devices & Browsers)
Display blocks only for devices such as iPhones, Andriod, Windows, Linux or MacOS. You can also pick specific browsers such as Firefox, Chrome, Microsoft Edge and Safari. - Cookies
Control the visibility of blocks if browser cookies are present or not. Use it to create dynamic content site wide.
Time
- Date Schedule – Range
Set the visibility of blocks between date ranges. You can schedule content such as banners, events and notices to appear after a set date. Setting an end date is optional. - Date Schedule – Recurring
Running recurring events? You set blocks to be visible between timeframes every day or even for specific week days. Mix and match Date Ranges & Recurring Dates to your needs.
Advanced
- Post Meta (Custom Fields)
Love creating reusable blocks, but need them to be dynamic? Conditionally display blocks based on the meta data of the post/page that visitors are viewing. Post meta fields is also known as Custom Fields. - Post ID’s
Great for reusable blocks and Full Site Editing. Display block only pages that match or don’t match specfic IDs. - PHP Logic
Display unique content based on PHP functions that are calucated as “TRUE” or “False”. You can also add your own functions, this makes Conditional Blocks easy to integrate with all third-party plugins and setups.
WooCommerce
- Cart Products | Coming
Control the visibility of blocks based on the WooCommerce products in the customer’s cart. - Cart Total
Control the visibility of blocks based on the total value of the customer’s cart using WooCommerce.
How to change the visibility of blocks without a plugin
Okay, so if you want to write your own code using PHP & JavaScript (React), you can definitely can. However it’s no easy task. That’s why I created the Conditional Blocks plugin to help you. Consider using the PHP Logic condition to help you quickly create new visibility conditions.
Firstly, you should look at how WordPress renders blocks to HTML. This happens on the server side using PHP.
One of the main filters that you can access is the called render_block (See the render_block filter details here). The filter will give you access to two things for every single block on the page.
- $block_content | The block content is a string that contains the HTML markup for the block.
- $block | The block object contains all related information about the block that’s set inside the WordPress Editor (Gutenberg). You can access all existing and custom data attributes here.
Here’s a small example snippet of disabling a block if “myCustomToggle” attribute equals true.
function my_conditional_render( $block_content, $block ) {
    if ( $block['attrs']['myCustomToggle'] === true ) {
      return ''; // Don't render this block.
    }

    return $block_content;
}

add_filter( 'render_block', 'my_conditional_render', 10, 2 );
Code language: PHP (php)
I’m not going to go into how to create options (also known as inspector controls) inside the Gutenberg UI. Instead, you can follow Misha Rudrastyh’s Custom Inspector Controls guide. You will need to setup a development environment that’s ready for the Block Editor.
Final Thoughts
Controlling the visibility of web content can be extremely powerful for creating a great user experience and marketing campaigns. I encourage you to look around our site – you might get inspired!
Why not give Conditional Blocks Pro a try? If you have any ideas for future conditions, just let me know!