Aside from content publishing, content restriction is also a valid strategy that can boost your marketing or conversion effort. You may think that content restriction is counterproductive, but it’s actually helpful because it can narrow down the content to a group of selected users. It’s even possible to hide an entire page while you’re working on the content.
If you’re wondering how to restrict content based on specific conditions, just sit back and read this article thoroughly. We will cover the different types of built-in WordPress visibility options as well as some plugin recommendations to help improve your workflow.
What is Content Visibility in WordPress?
The status and visibility options on posts and pages determine when and to whom the content should be visible.
Status options
- Draft
- Pending Review
- Published
- Scheduled (will be published automatically later)
When you first create a new post it will automatically be assigned the “draft” status. The draft will only be accessible to users who are assigned the admin, editor, or author role within WordPress. Once the post is ready you can either publish it straight away or choose to schedule the post for a later day.
Once you’ve set the post has been published, the post visibility options will take effect.
The Different Types of WordPress Visibility
There are three major types of built-in visibility options for WordPress. All of these options can be set easily under the Publish section of your post.
Public Visibility

Public visibility is the default option for all WordPress posts. This option simply means that the post is finished and everyone can see the content after it is published. Public visibility is necessary for Search Engines like Google to index the page. Setting individual pages to indexable is usually done with an SEO plugin.
Public posts are great for personal blogging or informal content delivery for a wide audience. But if you’re planning to create a membership or private website, then you’ll need to use additional tools to narrow down the audience.
Private Visibility
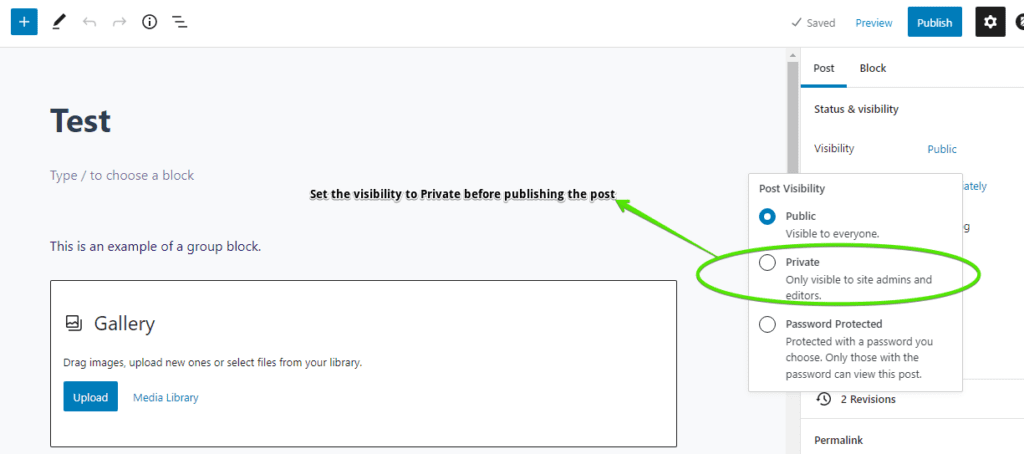
The Private visibility option limits the availability of the content to Administrators or Editors. This visibility option is great for unfinished or in-progress posts. Additionally, private posts will show on the website’s frontend while Admins and Editors browse the site. This function allows them to see how the post appears on the blog page similar to all posts or latest posts. Plus, a private post usually has the word PRIVATE before the first word of its title.
Internal content is another purpose of a private post. If you want to create a post with sensitive information, just set it to private and limit the visibility to WordPress Admins or Editors.
Password-Protected Visibility
As implied by its name, Password-protected visibility is a feature that makes a post visible only to those who have the correct password. This Password-protected feature is a great way to distribute content to an exclusive audience. For example, a group of users subscribed to your secret newsletter, eager to learn more about your content. As a site owner, you can just give the password to your paid subscribers.
Password protection is also another way to leave special instructions to your team. You can use a post, relay your instructions, and give the password to people that you absolutely trust. This method is applicable for niches with sensitive content such as political blogging, exclusive tech news, fashion gossip, and active journalism.
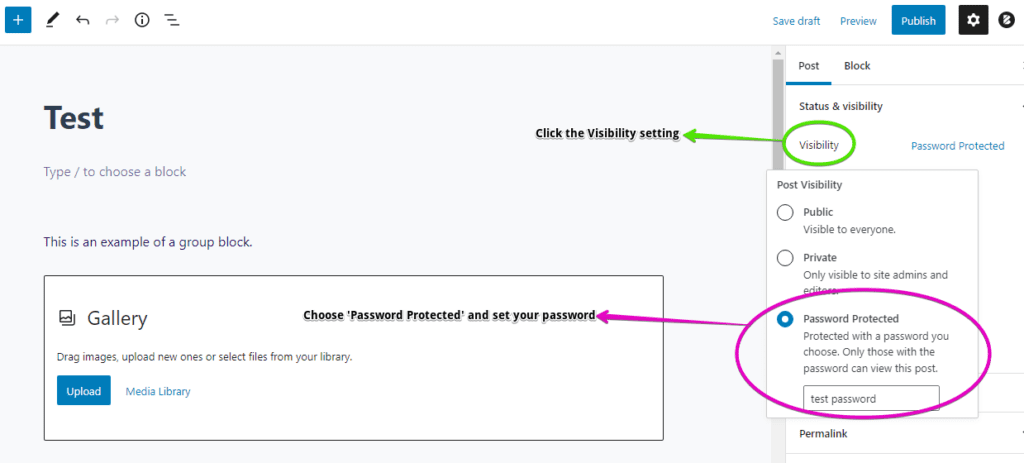
Here are the steps for setting a password for your post:
- Click the Visibility setting in the Post panel.
- Choose ‘Password Protected’ in the dropdown section.
- Add your desired password.
- Publish the post whenever you’re ready.
Save time creating advanced WordPress sites.
Our no-code plugin just clicks.
How to Modify Your WordPress Site’s Search Engine Visibility?
Visibility on Google, Bing and other Search Engines
Modifying any of the built-in visibility functions in WordPress is the easiest way to hide your website pages and posts. If a page is set to private or password-protected, it will no longer appear in search results.
While the default visibility method is easy, you may often need to have finer control over the content on your site that is set to be ‘index’ or ‘no-index’.
SEO Plugin to modify the index settings
Robots.txt Modification
Robots.txt is a unique text file meant to instruct bots to crawl pages on any website. This file operates under the robots exclusion protocol that determines how bots crawl pages and index various forms of content. Any webmaster or site owner can modify robots.txt to set if bots must crawl a page or not.
To modify the visibility of your site through robots.txt, you can take the following steps:
1. Open robots.txt
2. Enter the following lines of code:
User-agent: *
Disallow: /your-post-or-page-url
Basically, the user-agent line determines which search engine must be prevented from indexing the site. The asterisk sign pertains to the directive that all search engines cannot index your website. On the other hand, the disallow line specifies the URL of the post that you want to hide.
The user-agent and disallow codes can be used multiple times within a file. You can stop the bots from crawling different pages while specifying the intended search engines.
Keep in mind that the bots may not adhere to disallow commands all the time. There are other variables that affect the way bots (or spiders) crawl your pages. Some of these variables are algorithm updates, page relevance, and page content.
How to change the visibility of page sections in WordPress
We’ve discussed how to create private posts/pages, though what about specific sections of a page?
Conditional Blocks is a useful plugin that allows you to change the visibility of any content within the WordPress Block Editor.
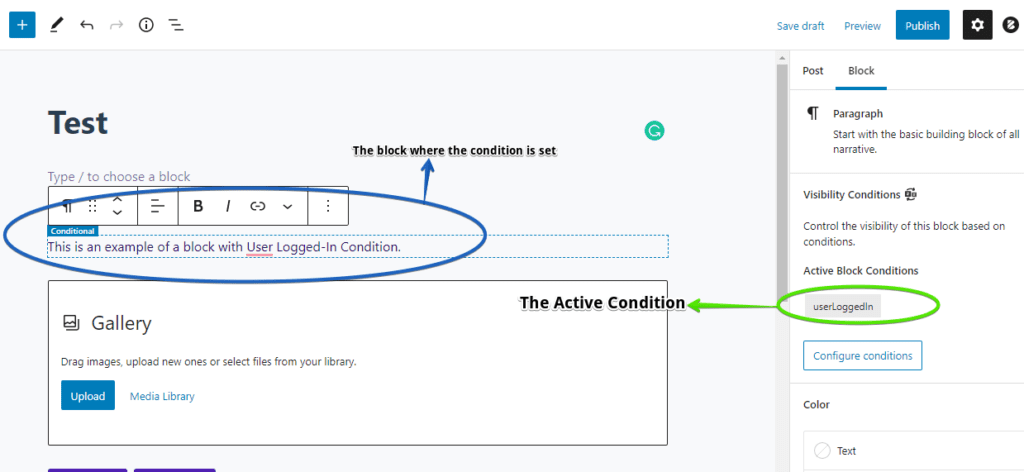
In the first example, you can see that a block is integrated with the ‘user logged-in’ condition. This simply means that the block can only be seen by users logged in to your website. The condition is useful for offering exclusive VIP content such as industry guides, secret recipes, tips & tricks, and news.
These are some of the popular conditions of Conditional Blocks:
Responsive (Screen Sizes)
A condition that restricts the block content based on users’ screen sizes. You can set a block to be viewable on mobile, desktop, and tablet devices.
Logged Out Users
You saw the ‘user logged-in’ condition in the first example. The opposite condition of ‘user logged-in’ is ‘user logged-out.’ This condition specifically targets logged-out users, allowing the site owner to make exclusive content designed to convert visitors into subscribers.
Lockdown
The Lockdown condition locks a content block from view. You can work on the block as long as you want and your site visitors won’t see the unfinished content. It’s possible to lock down multiple content blocks at the same time.
User Roles
The User Roles condition sets the content visibility for specific user roles indicated in your website. With this condition, you can target registered and non-registered members for general or limited content.
Post
The Post condition will let you choose individual post types for visibility adjustment. This is a great condition for blocks with embedded widgets and blocks readied for FSE (Full Site Editing).
Conditional Blocks has tons of conditions that can be fully customized according to your preferences. Whether you have a personal or professional website, Conditional Blocks can improve your site workflow and let you focus on long-term business growth.
Final Notes
WordPress visibility may be tricky to understand at first, but it’s an essential function that can improve your content distribution effort. More importantly, tinkering with WordPress visibility functions will help you easily manage finished and unfinished pages.
Take your WordPress visibility features to the next level today. Get Conditional Blocks and try the free conditions for your WordPress site!